15 Oct 2017
Reactive Swift is a Functional Reactive Programming framework for Swift. It’s awesome. It can make your code declarative, simple and way less stateful. It can handle things that normally need a bunch of ifs and bool state, in just a handful of lines. It’s incredibly concise. I could honestly go on and on, but you’re probably reading this because you know it’s awesome and you want to get into it.
Well it’s your lucky day, because this series of posts is designed to ease you into FRP with ReactiveSwift, from the perspective of regular iOS development. I’m not going to start with a reactive login screen (FRP’s TodoMVC). We’re going to start with basic primitives and build up from there. Hopefully after reading these posts, you’ll skip the usual first step of the FRP n00b, which is to reactive allthethings! end up with a convoluted stinking pile of 💩 and then do a rewrite.
So let’s get started. I’m gonna to assume you’re fluent in Swift, you have a clone of the Reactive Swift repo, and you have the playground fired up and ready for action.
Signals, Events, Values, say what?
Let’s say you want to send a String somewhere. In ReactiveSwift speak, that String is a value. This value is sent as an Event using an Observer, which emits it on a Signal. Anything interested in this String can connect to the other end of this Signal to receive it.
String => (Observer => Signal) => YourStringReceiver
At the moment it kinda seems like a regular delegate pattern with different nomenclature. Let’s dig a little deeper. So, Observer and Signal go hand in hand. All Signals have an Observer that emits the events through it, either implicitly or explicitly. Let’s create the pair explicitly using Signal’s pipe() convenience constructor:
let pipe = Signal<String, NoError>.pipe()
This returns a tuple, giving the tag input to the Observer and output to the Signal. Signals and Observers are generics, and in this case we specialise them to work with String values and no error handling, for now. More on errors later.
Now we have the pipe, we can observe values sent through the Signal by attaching a closure to it:
pipe.output.observeValues { value in
  print("🚙 My other car is a \(value)")
}
Now, every time an String is emitted on the Signal this observeValues closure is fired with it as the value.
Finally, to actually emit our String, we send it to the Observer object:
pipe.input.send(value: "DeLorean")
The Observer emits DeLorean on the Signal as a value Event (more on Events later), arriving at our observation closure. The direct result of the above line being executed is the observeValues closure being fired once with DeLorean as the value.
All together now:
let pipe = Signal<String, NoError>.pipe()

pipe.output.observeValues { value in
  print("🚙 My other car is a \(value)")
}

pipe.input.send(value: "DeLorean")
Copy/paste this into the sandbox playground and play around with it. Try extra pipe.input.send lines, changing the value sent for each. You’ll see in the debug console that the block is fired exactly once with each value received in the order we sent them.
So one of the cool things about Signals is that you can attach any number of closures. That is to say, they can be observed by more than one thing. So the value of one send(value:) can be received and used in many different ways and contexts.
let pipe = Signal<String, NoError>.pipe()

pipe.output.observeValues { value in
  print("I got 99 problems but a \(value) ain't one")
}

pipe.output.observeValues { value in
  UIPasteboard.general.string = value
}

pipe.output.observeValues { value in
  UserDefaults.standard.set(value: value, forKey: "JustSummerThings")
}

pipe.input.send(value: "🏖")
Neat. But what if we want to stop observing a Signal? In other words, disconnect a single closure. In a normal delegate pattern situation we’d simply nil the .delegate. In a multicast delegate situation we’d have a func to call to remove an individual delegate. In the world of ReactiveSwift where there is no distinct object but rather a closure, we need a more fine grained construct. This is where Disposable comes in. Each time you observe a Signal, you get a Disposable in return.
let pipe = Signal<String, NoError>.pipe()

let problemsDisposable = pipe.output.observeValues { value in
  print("I got 99 problems but a \(value) ain't one")
}

let beersDisposable = pipe.output.observeValues { value in
  print("The \(value) is my favourite place to sling code")
}

pipe.input.send(value: "🏖")
problemsDisposable.dispose()
pipe.input.send(value: "🗽")
When you call dispose() on a Disposable it disconnects the observation, so the closure no longer fires.
Already this is pretty cool and we’re barely scratching the surface. We basically have a multicast delegate pattern in a handful of lines, without custom protocols 😎
A Series of Unfortunate Events
But there’s more to Signals than just transmitting values. They can also fail, or be interrupted, or complete. The Event enum is used to represent all these events. When you .observe a Signal, you’re really observing the Events being emitted on that Signal. The .observeValues is a convenience which allows us to only pay attention to the Event.value events - in our case above, the String values. Let’s take a look at the other Event cases.
Firstly, .failed. Funnily enough, this is used to represent something that has gone wrong 🙅♂️. This has an Error type associated value. This gives us strongly typed and declarative error messaging. But there’s more to it. If a Signal receives a .failed Event, it will stop emitting any further Events. So this is used if we encounter a situation where we cannot continue and need to inform anything observing the Signal what went wrong.
enum EmojiError: Error {
  case nonLyrical
}

let pipe = Signal<String, EmojiError>.pipe()

pipe.output.observe { event in
  switch event {
  case let .value(value):
    print("I got 99 problems but a \(value) ain't one")
  case let .failed(error) where error == .nonLyrical:
    print("Bro, do you even Jay Z?")
  default:
    break
  }
}

pipe.input.send(value: "🏖")
pipe.input.send(value: "🍺")
pipe.input.send(error: .nonLyrical)
pipe.input.send(value: "🏖")
Notice that the last value "🏖" didn’t send, because the Signal had received .failed . Perfect. Sidenote: normally we would use an operator to detect that "🍺" is the wrong emoji and automatically fail. More on this later.
Next we have .completed. This also causes the Signal to stop, but without an Error. It is generally used to indicate success - the Signal has finished without issue and we don’t need it anymore.
let pipe = Signal<String, NoError>.pipe()

pipe.output.observe { event in
  switch event {
  case let .value(value):
    print(value)
  case let .completed:
    print("🤗")
  default:
    break
  }
}

print("Hey barkeep, mix me something good")
pipe.input.send(value: "2 shots of Campari")
pipe.input.send(value: "Ice cubes")
pipe.input.send(value: "Soda")
pipe.input.send(value: "2 lime wedges")
pipe.input.sendCompleted()
Finally there’s .interrupted, which is very similar to .completed but is used to simply stop the Signal rather than indicate success. This might not seem useful right now, but when we get into operators and chaining it will become clearer. As an example, pretend a Signal could be used to process an array of images[^1], but during processing the user leaves the screen. The Signal should stop work, but it didn’t complete nor did it error. It has been interrupted. This way, the app can clean up anything being used for image processing but leave out the success path that would have shown an alert or something. Without any bools or ifs or external state 💯
In each case above where the Signal stops (.failed, .completed, and .interrupted), it will not emit any further Events even if its Observer attempts to. So if we’re clumsy with our code and try to send a .value Event after a Signal has completed, it won’t send - the Signal is already stopped. It also won’t throw an exception or anything.
And one last note about manually created Signals (like we do above with .pipe): if they still have active observers (closures that haven’t been disposed), they won’t deinit until they receive .completed, .failed or .interrupted. It’s really important to check your Signals deinit correctly when you’re starting out.
Phew, quite a lot to take in I’m sure. So that’s all for now. Stay tuned for the next post, where we add operators to the mix and build a small playground to search for party parrot gifs. Of course. See you then! 👋
04 Nov 2016
Today I want to show off a very handy operator in Reactive Cocoa called replayLazily. This little guy (man I wish there was a sloth emoji, it would be so perfect) will perform the work once and then hold onto the resulting value, so when someone else calls start on him, he can just replay the value instead of performing the work again. Like the lazy sloth he is.
But, and here’s the cool part, if while doing the work you call start on him again, he won’t actually start again. He’ll wait until the work is finished and then just replay it for you. Great for those slower network requests, or for when your user has slow connectivity.
Or…. prefetching! On app start you can call start on these guys and let them fetch, all the while knowing that if they are still waiting for a response when the user enters the screen the fetch was for, it won’t fire off a second fetch, it will just wait for the value. Or, if the prefetch completed before the user got there, it will be replayed instantly when they hit that screen. No logic to worry about, just 1 simple SignalProducer with a .replayLazily(upTo: 1) on the end 🎸
class DataProvider {
    static var producer = DataFetcher.fetch().replayLazily(upTo: 1)
}

// Prefetch as early as possible
DataProvider.producer.start()

// Use it normally when you need it
myClassThatNeedsData.dataProperty <~ DataProvider.producer

// Or if your app isn't fully reactive
DataProvider.producer.startWithValues { values in
    // do something cool with said values
}
Yep, that’s your prefetching data store right there. Mindblown.gif.
29 May 2016
Note: This is really outdated. Please see my newer posts on the topic!
Before we begin pt 2 of the ELI5 idiots guide to Reactive Cocoa 4 for dummies who are fluent in Swift 2 but know nothing about any version of Reactive Cocoa (though maybe know a little bit of what FRP is all about) (or TEIGRC4FDWAFS2BKNAAVRC for short), I’d like you to press play on the following video:
Smooth Operator (Official Video) - Sade
Multi Signal Structures
So far, everything we’ve done with Signals has been pretty basic. And while there is some real world use for them already, it’s still not useful enough to start bowing down before the FRP gods. But you see, this is by design. We have these really simple blocks that we use to build complex data flow structures that are expressed very concisely and neatly. How do we join these blocks together? Operators.
Operators transform the Values from Signals for different uses and contexts. When you transform a Signal, ReactiveCocoa gives you a new Signal which fires the transformed Events, so they can be chained. This is very much like the functions Swift gives us for SequenceTypes: filter, map, flatMap etc. As you already know (and if you don’t, get ready for the 💣), these apply to a SequenceType and return a new object of the same SequenceType, so they can be chained. In other words, if you filter an Array, you get a filtered Array in return, and you can directly map or whatever the result without assigning to a new var.
let longNamesCount = users
  .map { $0.name }
  .filter { $0.characters.count > 10 }
  .count
Operators function in the same way - chain them together to your hearts content. This lets you construct complex flow structures in a very concise way, all in the one place.
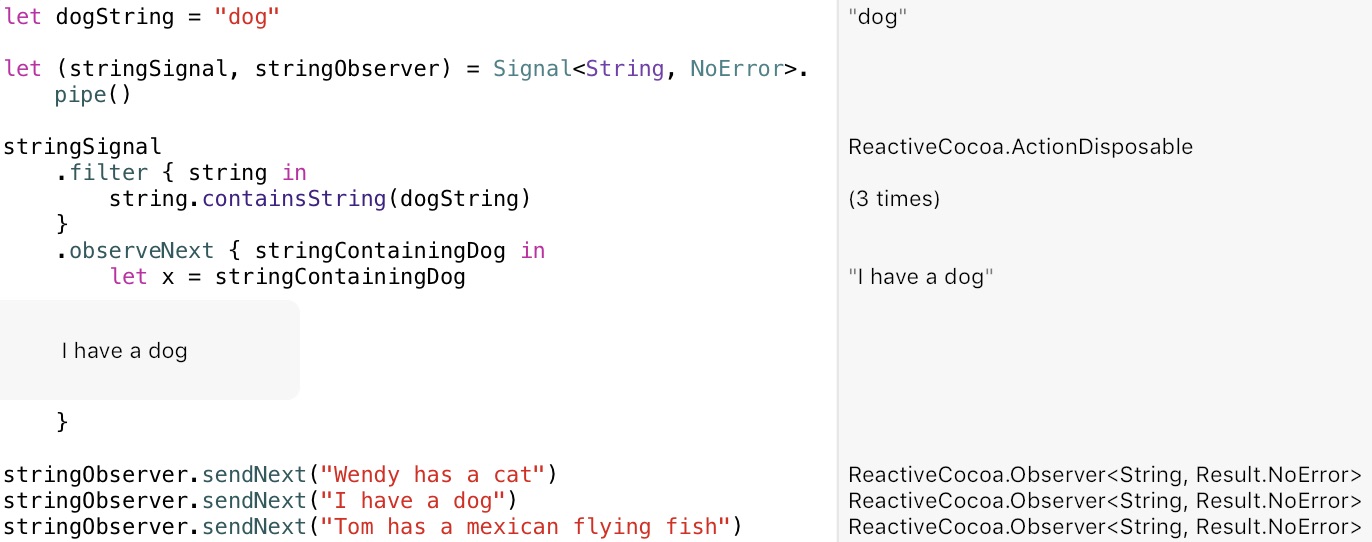
A simple demonstration of an operator in action: Say you have a Signal that has String values on it. Now, whenever that Signal has a String on it that contains the word “dog”, you want to be notified.
Here’s the wrong way to do it (but the only way we know how at this stage):

Seems reasonable? Well… not quite. I mean it works, but it doesn’t allow for any extensibility. For example, how do we notify more than one object that the string contains the word dog? Our observeNext closure (or the stringContainsDog function) needs to know about any object that needs to be notified. That sucks.
And what about other scenarios, like when a string contains “dog” and “cat”? Do we need a new external function for this? What if a different object needs to be notified on the new scenario? Here comes the giant flying spaghetti code monster…
What if I told you Reactive Cocoa has your back? 🕶

Did we just solve each one of those hairy problems in one go? In the same number of lines?? 😮
Say hello to operators.
Here we’re using the filter operator. Generally speaking, this operator receives Next Events from the Signal it’s attached to, and filters their Values using the predicate closure given. So in our case, take the Strings that come in from the stringSignal and filter them by “contains ‘dog’”. Notice how this logic moves out of our observeNext.
⛓Chains ⛓
This isn’t the whole picture though. Operators actually return brand new Signals that fire Next Events using their transform. So in the case of filter, it fires when the predicate returns true.
This is truly awesome for a few reasons, but first of all it means we can observe this new Signal to be notified when the string contains a dog, but not touch the behaviour of the Signal we’re filtering. Signals are immutable, and if we don’t introduce any side effects then they always do the same thing. Hey look, your code just got way easier to read and understand!
With operators, you can not only set up very simple flows like the above, but also very complex flows that are still easy to understand. And all parts of the flow are observable by anything. Woah 🎇
In fact, we can actually make this flow even more concise by just chaining it all together!
So nice. And because the return types of operators vs observe functions force the chain the follow the same pattern every time, we can reason about the flow easily. Create, transform, observe. Events start at the top and flow to the bottom. They don’t jump between different objects or files or anything like that (unless you want them to).
So, what about the extra notification, when the string contains “dog” and “cat”?
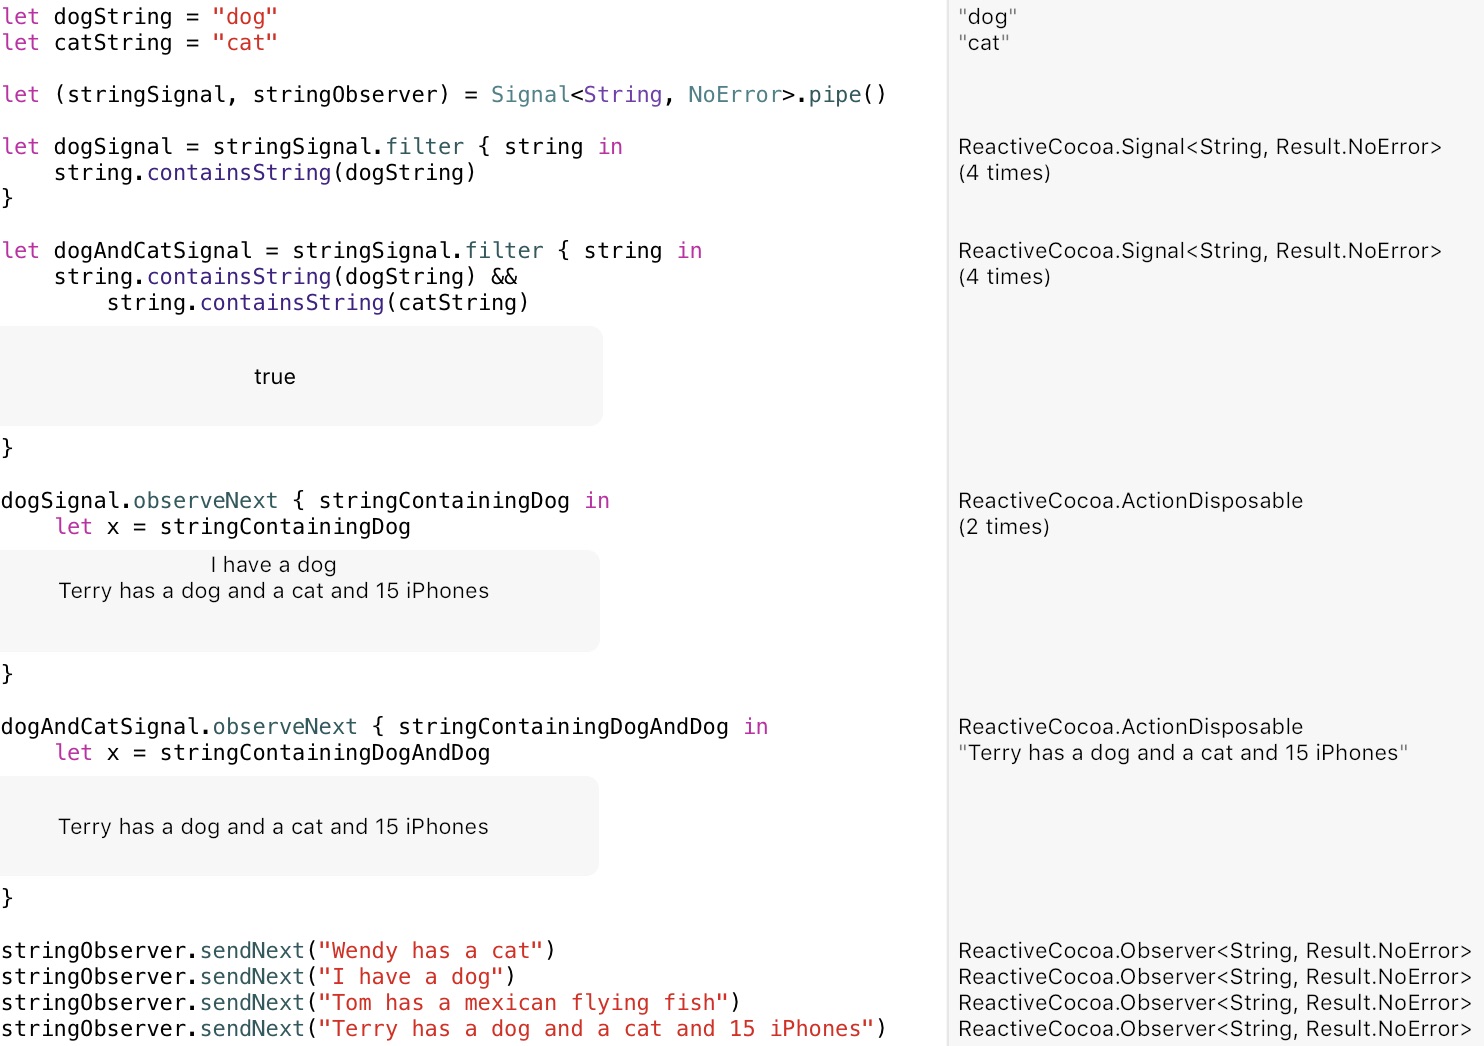
It’s too easy right? No side effects, no coupling, easy extension.
What if we don’t really want to get notified per se, but just want to replace the word “dog” with a 🐶 emoji?
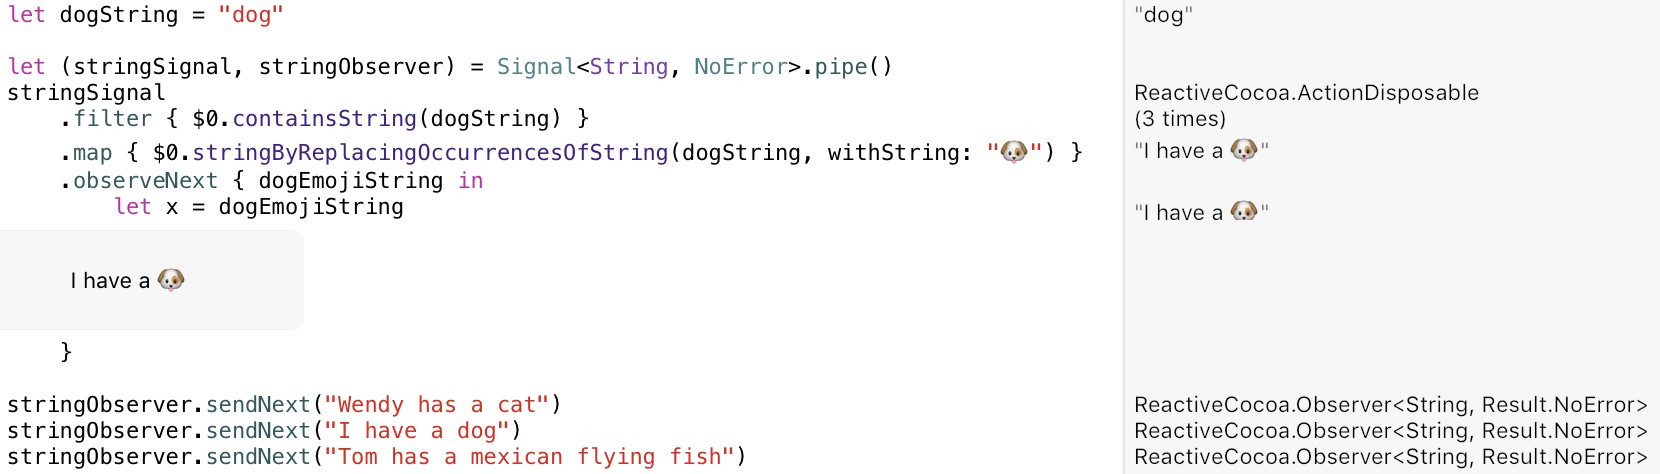
Pretty simple - we use the map operator which has the exact same “return a Signal that fires transformed Events” characteristic. So, our map creates a new Signal that fires Next Events with the word “dog” replaced with 🐶. We also just inserted it into our chain, no bother.
Error, Error, 123
What happens if a Signal sends a Failed Event?
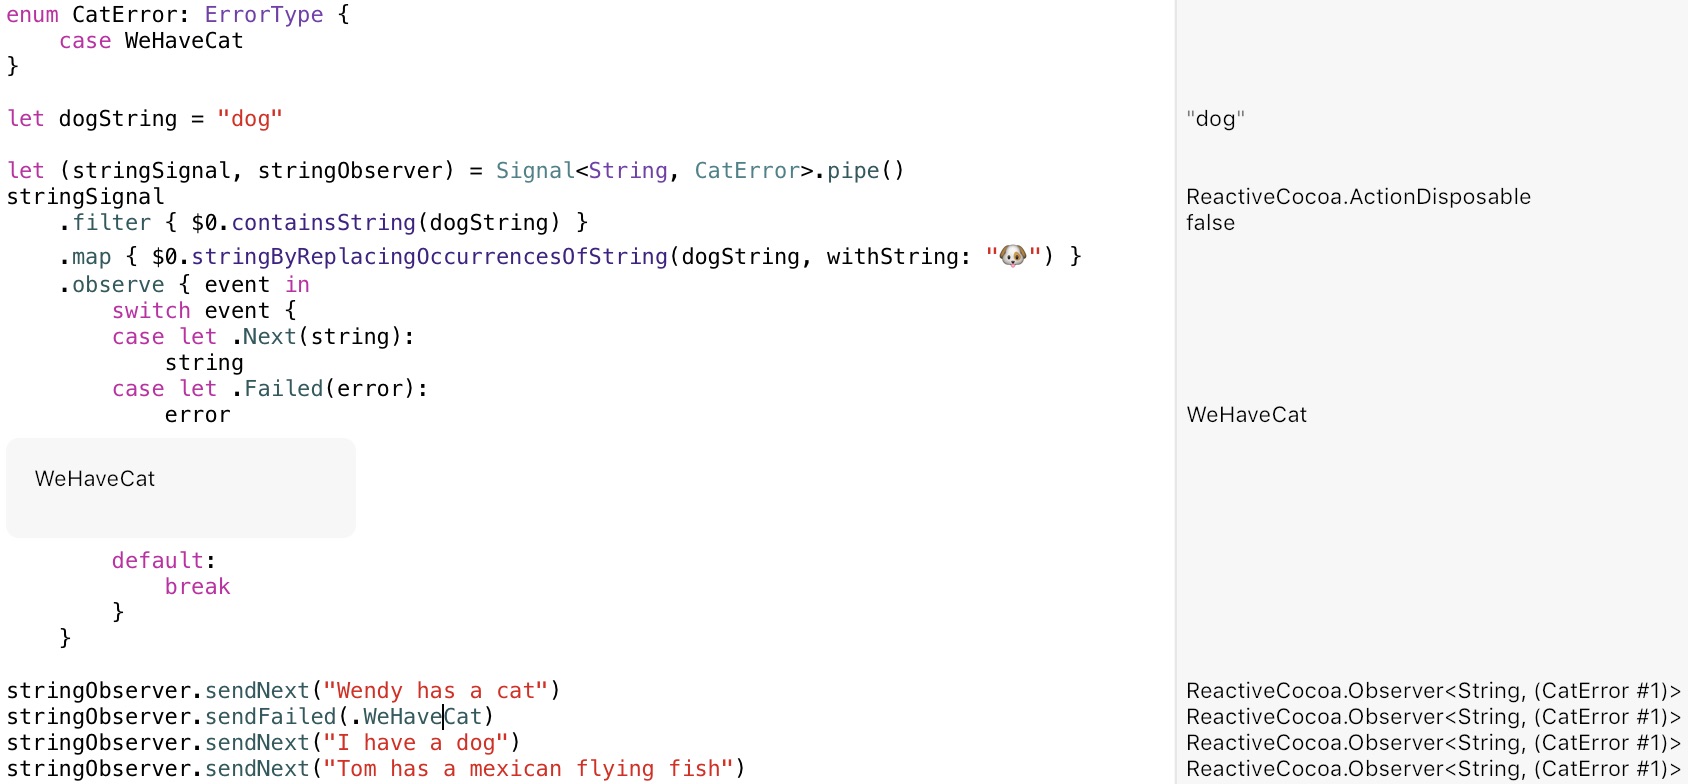
You can see that the cat ruined all the fun 😠. The Failed Event caused the first Signal to stop before James had his “dog” transformed into emoji form. So the Failed Event halted the flow of Events.
Also notice that so our Signal can throw a CatError, we have to specify this when creating the Signal. Strong typing and all that.
That was kind of a contrived example though - we should automatically fail rather than tell the Signal to fail. The string “Wendy has a cat” should automatically throw the .WeHaveACat Failed Event right? Operators to the rescue:
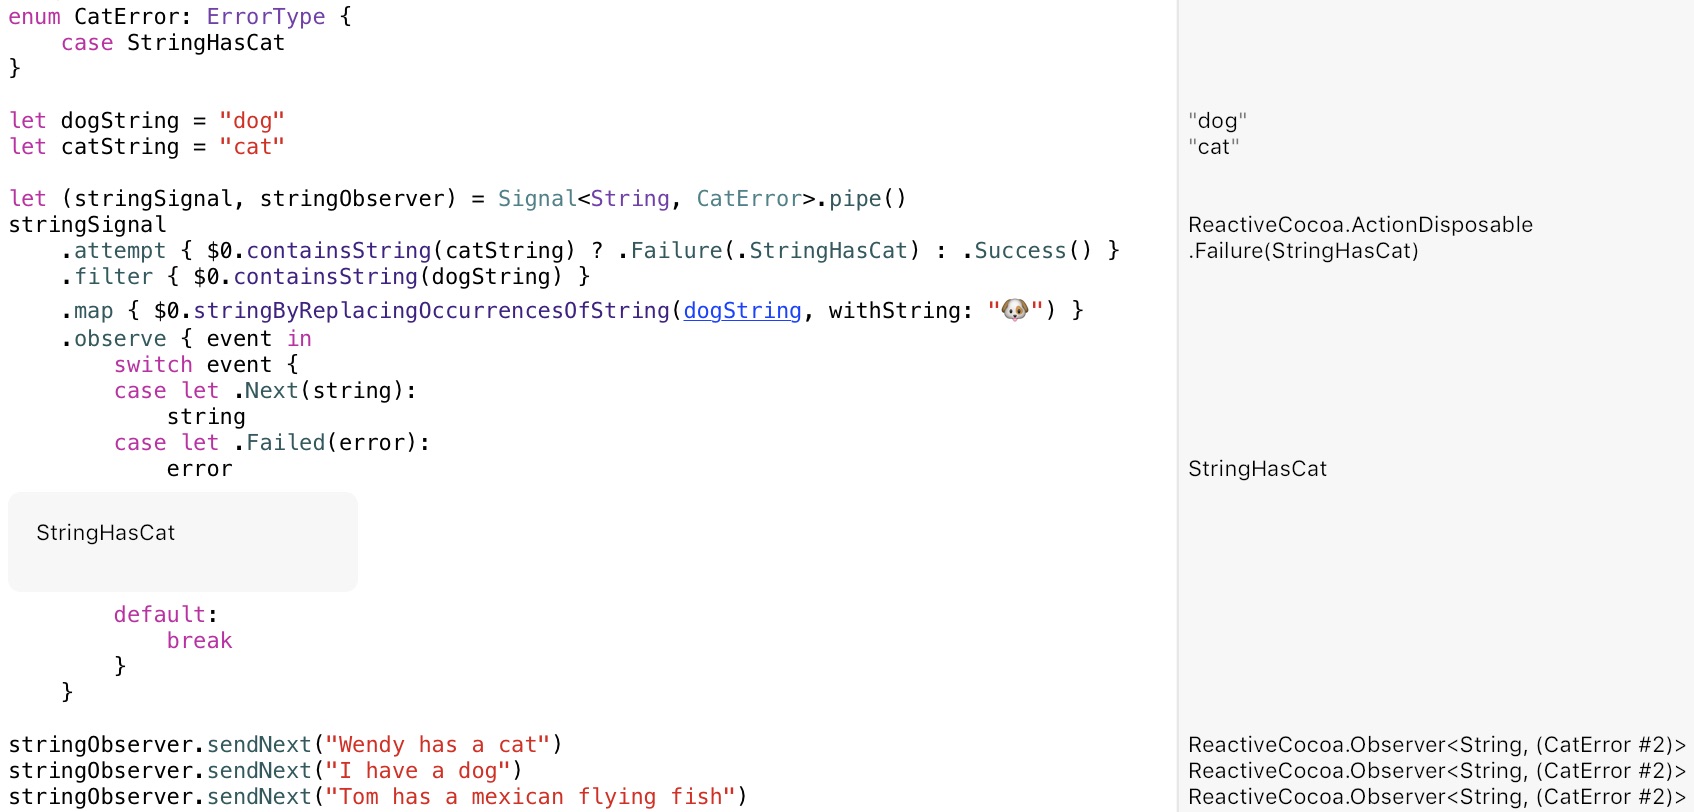
We can use the attempt operator to check for the error case and throw if it’s met. Even though Success doesn’t pass any value, it indicates that all is well and Events can continue down the chain untouched. Then it’s just business as usual.
Notice how all the logic for transforming our Strings is all in the same place, including error handling? And it’s totally decoupled from anything that needs to react to the transformed Strings or errors. Can I get a hell yeah?
In the next installment we take things next level: SignalProducers. Until then! 👋
23 Apr 2016
Note: This is really outdated. Please see my newer posts on the topic!
Reactive Cocoa 4 is pretty new and there are some big syntax changes since previous versions. Unfortunately this means all the information online at the moment is more concerned with those changes rather than showing you how to use it from scratch. If you’re new to the whole thing, that steep FRP learning curve is even more steep than normal. Until now. Hold on to your flatMaps, I give you:
The ELI5 idiots guide to Reactive Cocoa 4 for dummies who are fluent in Swift 2 but know nothing about any version of Reactive Cocoa (though maybe know a little bit of what FRP is all about)
Before you start, get a clone of the Reactive Cocoa Github repo up and running in Xcode, set up a playground that imports the ReactiveCocoa and Result frameworks (checkout that PR if you’re lazy like me) and grab a fresh cup of ☕️
Right, you good? Ok let’s go.
Signals, Events, Values, say what?
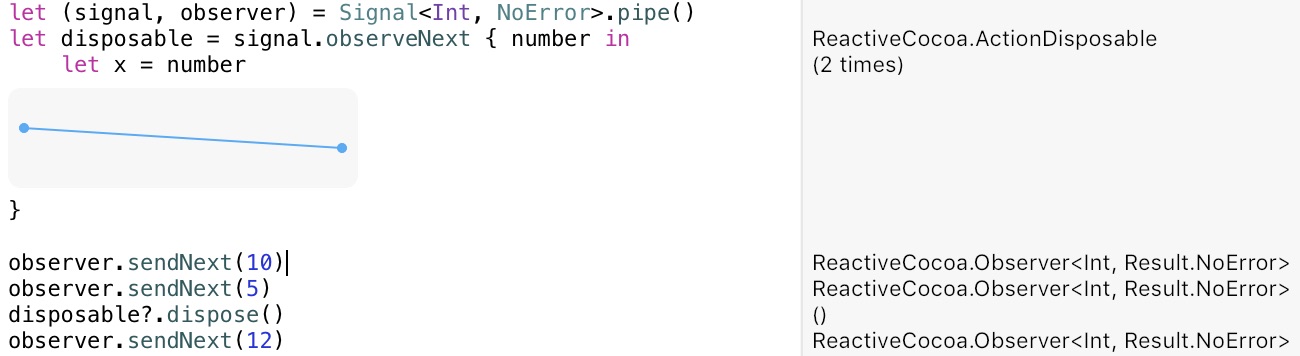
Say you want to send an Int somewhere. In ReactiveCocoa 4 speak, that Int is a value, that is sent on a Signal. A Signal can be used to send any number of values over time, so it’s best to think about it as a continuous stream that values flow down. For an object to receive these values, it needs to observe the Signal.
Makes sense. So let’s send our Int. To do this, we create a Signal and it’s corresponding Observer, and we send the Int using the Observer object. This can be slightly confusing at first, but it’s very simple: the Observer object isn’t the object observing the Signal - it represents objects that are observing the Signal. So when we send a value using our Observer object, we’re really sending a value down the Signal to everything observing the Signal.
That’s a bit to take in, let’s demonstrate. We’re going to set up a Signal + Observer pair using the pipe constructor and send some values:
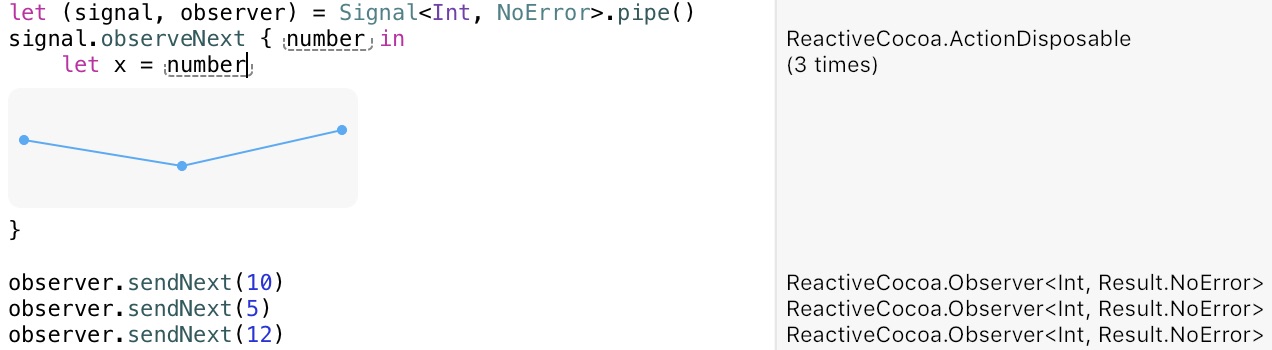 Yep, no code to copy paste. Suck it up, type it out, mess with the values, play with the graphs, it’s better this way
So what’s going on here? First, we use pipe to get our Signal Observer pair. Our Signal has been set up to have Ints flow along it. We then set up a closure on the Signal to fire every time a value is sent (effectively decoupling the Signal from anything observing it - nice). Finally, we send some Ints down the Signal using it’s Observer object.
As you can see from the pretty Xcode Playground graph, the observeNext closure has fired once for each Int sent, in the order that we sent them 🎉
But what’s with the Next stuff? Well, values are actually sent down a Signal wrapped in Next Events. There are a few different types of Events that can be sent down a Signal - more on this shortly.
So the cool thing about Signals is that they can be observed by any number of closures (and in turn, any number of objects). So the value of one sendNext can be received and used in many different ways and contexts.

Event Types
As mentioned before, values sent down a Signal are actually wrapped in a Next Event. There are other Event types too.
First, there’s the Failed Event. The Failed Event carries an ErrorType and when sent causes the Signal to stop. So if we encounter a situation where we want the Signal to stop, and to inform anything observing the Signal what went wrong, we can simply sendFailed with an ErrorType:
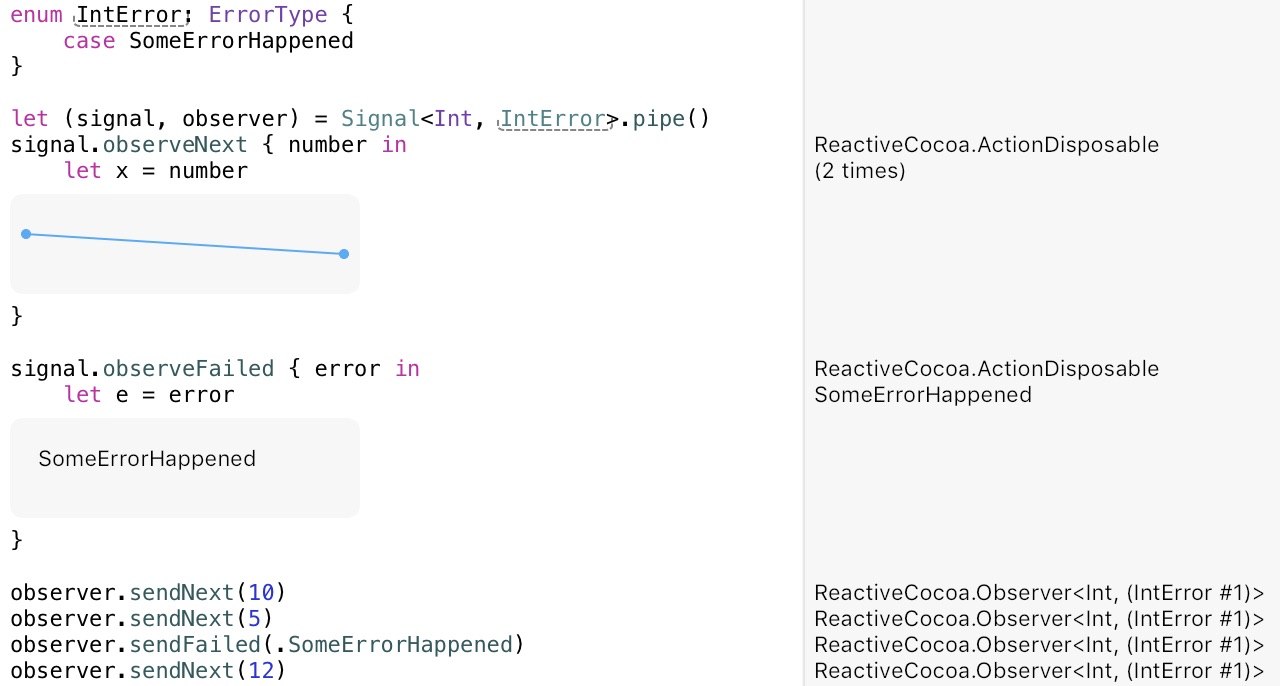
The last value (12) didn’t send, because the Signal had already failed with the Failed Event carrying the SomeErrorHappened Error. Perfect.
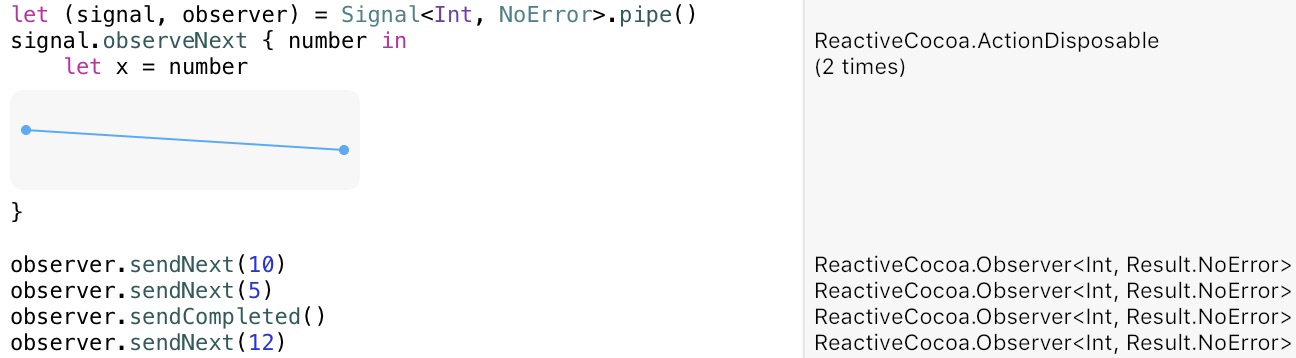
We also have a Completed Event. This also causes the Signal to stop, but without sending an Error Event. We use this to indicate the Signal is finished and we don’t need it anymore. Even if we’re clumsy with our code and try to send a Next Event after a Signal has Completed, it won’t send - the Signal is already stopped.
And finally there is the Interrupted Event, which is very similar to the Completed Event, but happens automatically. So you know how you call the observe methods on the Signal to add closures that fire when different Events flow down the Signal? Each time we set up one of these observations, we get a Disposable object. Using the dispose method on this object, we can remove or dispose of that particular observation. And when there is nothing left observing the Signal, it stops with the Interrupted Event. If a tree falls in the forest and no one is around, does it make a sound? We’ll never know, that Signal was Interrupted when everyone left the forest 🌝
So this is all kinda interesting and cool, but can we use any of this in real world code yet? Let’s see what we’ve got so far:
- An object other things can observe to receive values (
Signal)
- An object to send these values (
Observer)
- Error handling
How many times have you updated a value in a model object, and then needed to refresh anything that uses this model object for display? Was it annoying and a little more complicated than it needed to be? Was your view suddenly coupled to your model? Wouldn’t it be great if there was a decoupled way of notifying all objects interested in this value change? Without the hassle of KVO?
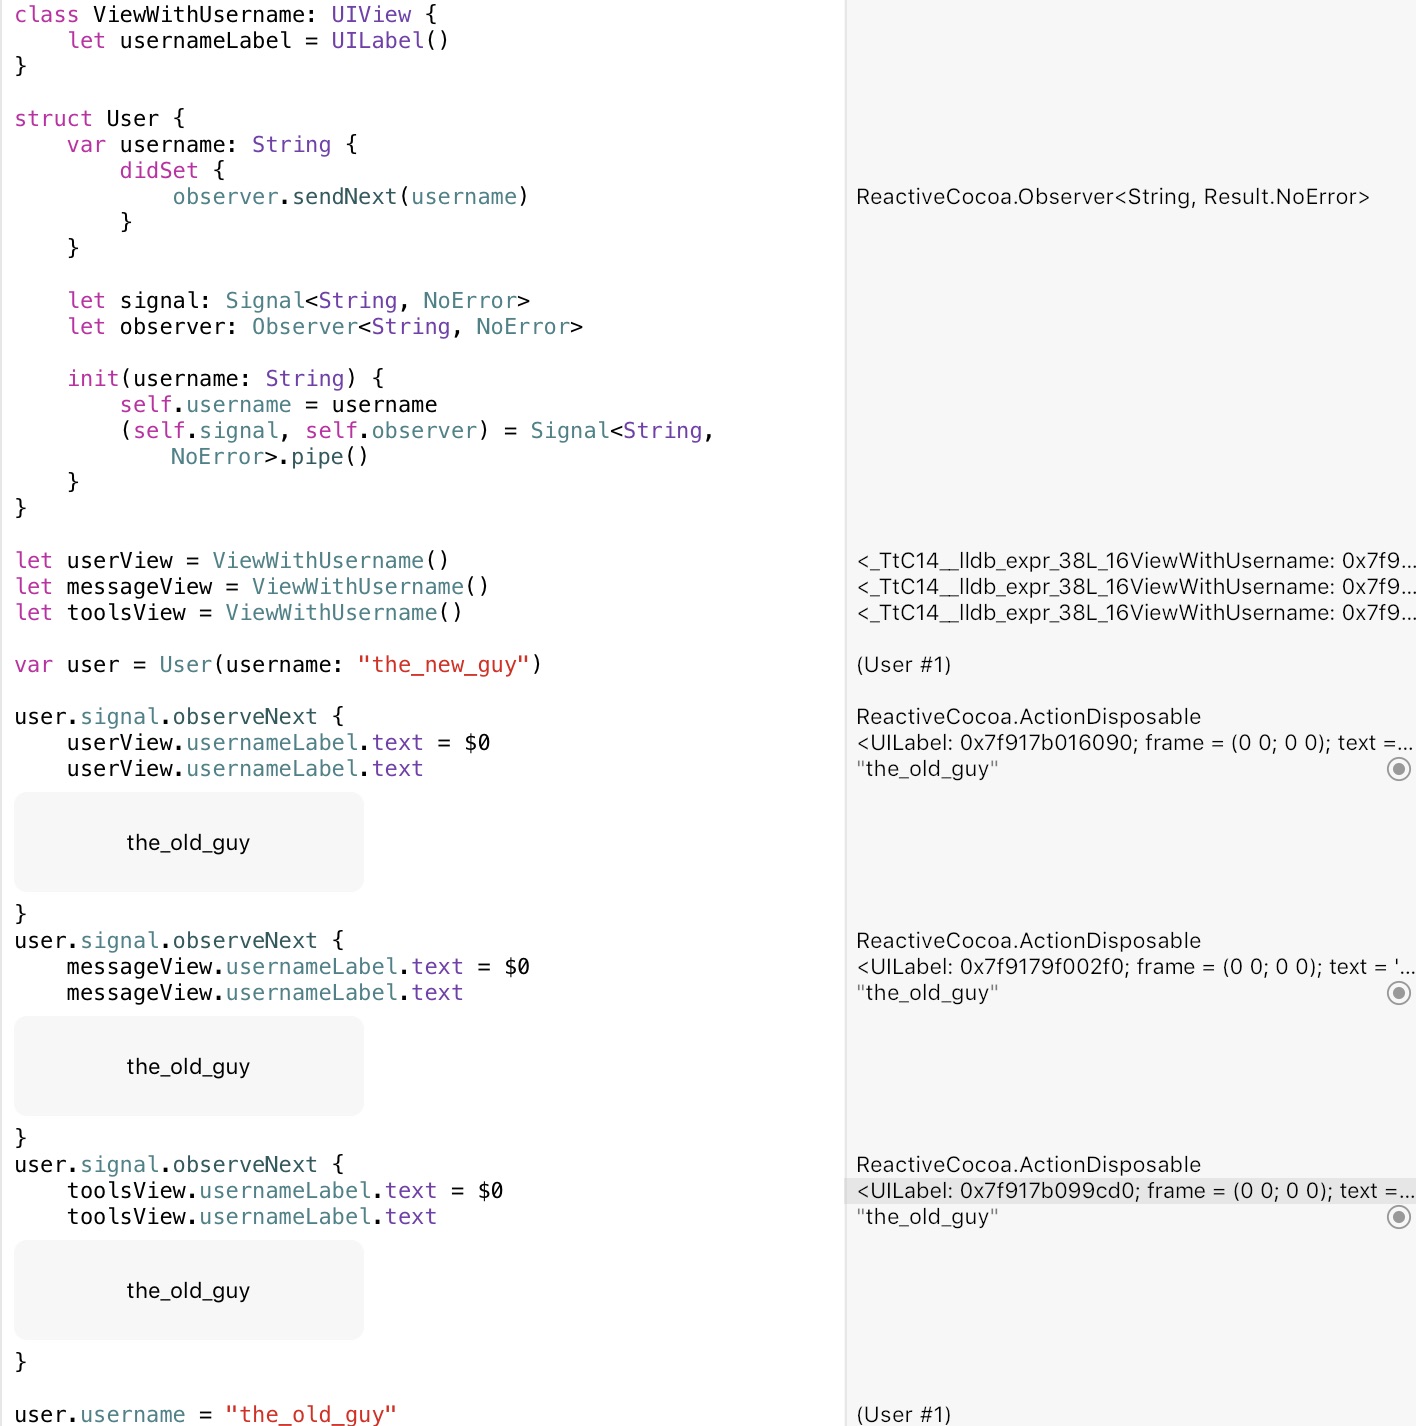
That’s pretty neat. Really neat. We have all the logic in one place (observation setup, and what happens when values change), simply by providing a Signal that the UILabels can observe for changes. No coupling, endless observations, everything in sync. But it requires a bit of boilerplate (an Observer and Signal for each of my model’s var’s). Imagine what happens when we have a bunch of models all with different vars. Well, guess what? This is such a common usage of Reactive Cocoa that they’ve thought of this too. Welcome to
Mutable Properties
These take the pattern above and wrap it up into a neat little package. No more boilerplate. Let’s see the same thing, but using a MutableProperty var:

Well that’s super neat. Really super neat. By wrapping our vars as MutablePropertys, each of them have their own little Signals that fire whenever the value changes. But we’re not done yet - our observeNext’s all follow the same pattern: update a var when new values arrive. Guess who thought of this common scenario again? Welcome to
Bindings
A Binding allows you to say, in one fell swoop of the <~ operator, “whenever this var updates, make sure this one updates to it’s value”. Check it out:

Here we set up a UILabel subclass to provide the MutableProperty already set up to bind to. Then we just connect stuff up using <~ and that’s that.
Once we have the BindableLabel, look how simple and easy our code becomes. Everything needed to understand the “make our label text always equal whatever value the username var is” is literally on 1 line. Much declarative, so simple. In fact, if we focus in on the code that creates our model, views and joins them together, it looks like this:

Take that KVO! 🙌
You can wrap anything with a Signal Observer pair and expose it for other objects to observe, or even bind to MutablePropertys, moving all the logic to do with an action into one easy to read place. How powerful is that. But unfortunately it’s not always as simple as our String <~ String binding here though. We sometimes need to massage our values, wait for values from other Signals, ignore certain values, or change types entirely before they can be used by different objects….
And that’s exactly what the next installment is about (and more). See you in pt 2! 👋
11 Aug 2015
I have a function that returns a specific nested dictionary. It looks like this:
private func fontDict() -> [String: AnyObject]? {
  if let fonts = configDict["Fonts"] as? [String: AnyObject] {
    return fonts[self.rawValue] as? [String: AnyObject]
  }

  return nil
}
My view performance was lagging so I did a quick profile. This method was clocking in at 156ms on my main thread (it’s called a lot). Not good.
Refactoring to this:
private func fontDict() -> [String: AnyObject]? {
  return configDict["Fonts"]?[self.rawValue] as? [String: AnyObject]
}
And the time drops to 36ms. Quite the performance boost!